(Winter 2026)
Rob Roy Cedar Strip Canoe:
● Intro & Station Forms● Building the Strongback
● Cedar Strips
● Stripping the Hull
Intro & Station Forms
One could assume I already have enough watercraft (see the rest of this website) but since I recently retired, it seems like a good opportunity to start another boat-building project!
This time it will be a Rob Roy 13 cedar strip canoe — a Ted Moores design from Bear Mountain Boats.
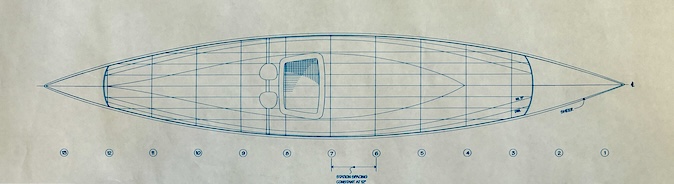
Rob Roy-style canoes have quite a history but currently, the term "Rob Roy" seems to refer to canoes between 10 and 14 feet with a kayak-like hull shape, low seating and double-bladed paddling.
This particular design from Bear Mountain Boats is exactly what I was looking for.
Check out this beautiful example of a completed version.
Regarding the strip-building process, there are hundreds of detailed amateur and professional tutorials available on YouTube and elsewhere, so I'm not sure I'll be providing much new information here. There are however a variety of options and decisions to be made along the way, so each project is slightly different and I'll be leaning toward simplicity, economy and reduced weight with this build.
So, let's started with unboxing the plans...
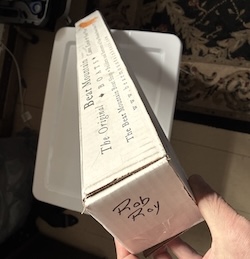


The box contains a Bear Mountain catalog, a 32-page step-by-step guide to the overall strip-building process and the plans – rolled up and sealed in plastic.

The plans consist of 4 sheets – a page featuring scaled views of the canoe, a page with full-sized plans for the 11 station molds and a separate page for each of the full-sized fore and aft stem mold plans. Also included are 2 sheets of carbon paper.
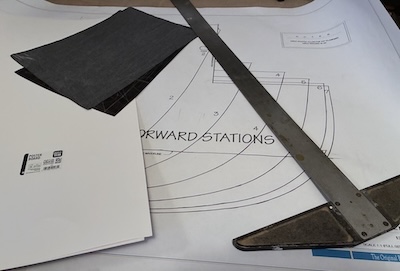
I'm anxious to get started on this project but my workspace will be a screened porch and it is currently early February with 15" of snow on the ground and below-freezing temperatures forecast. Although looking at the tasks ahead, I think I can get started with creating the plywood station forms and do some of the work indoors.
The patterns for the forms are provided as half-patterns – lines for the first half of a pattern can be transferred to plywood using the included carbon paper, then the pattern is flipped over along its centerline and traced again to generate the second half.
Rather than transferring directly to the plywood, I'm going to use an interim step that I envision will be more accurate and flexible.
I picked up some inexpensive poster board (40¢ a sheet) at Walmart.
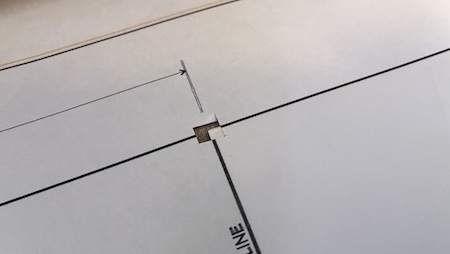
Then by cutting a small hole in the plans at the ends and intersection of the centerline and baseline, I was able to align the lines on the plans to the straight factory edges of the poster board underneath.
With carbon paper sandwiched between, I transferred the half-pattern onto the poster board.

Aligning and taping a second sheet of poster board under the first, then cutting out the pattern through both, gave me two identical half patterns.

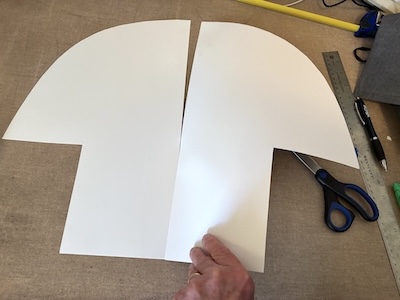
Joining the two halves together ensured the baseline and centerline were perpendicular and the two halves were perfectly mirrored.

After roughly blocking out two 4 ft. x 4 ft. areas on the floor, I maneuvered the patterns around until I was able to find an arrangement that would efficiently fit them all onto one 4' x 8' sheet of plywood.

I purchased a 4' x 8' sheet of 1/2" MDF and had it cut into two 4' x 4' panels for easier transport.
Then after some slight layout adjustments (to use the straight factory edge of the plywood for the baseline when possible), I taped the patterns to the boards and drew in some cutlines between each form.

Using a jigsaw, the patterns are now roughly cut and separated into individual pieces.

An easy trace around the perimeter of each poster board transferred the pattern line. I also included the centerline and water line on each mold for reference. My current jigsaw blade made quick work of cutting the MDF but notice the rough edges it left.
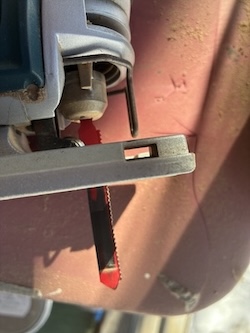
I found a blade specifically designed for composite lumber at the hardware store and decided it was worth purchasing.

It made a world of difference when cutting out the forms – smooth, clean and accurate!
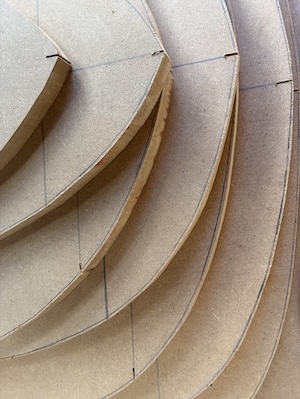
I deliberately cut just outside the lines leaving a little room for final shaping later.

An orbital sander did a good job of cleaning up the forms.

Final adjustments were made by repeatedly sanding and checking the molds against the lines on the full-sized plans.

They are now all exactly matched to the plans (note the thin black line showing along the edge of the form).

Here is the complete set. The Rob Roy hull is not symmetrical from fore to aft, so there are 11 unique station forms required.

After reading several books on the topic, I chose these two books as my general building guides.
The author of Building a Strip Canoe makes a good case for eliminating the commonly used inner and outer stem treatment at each end of the canoe, so I'll be following that recommendation and process for simplicity and weight reduction.

To do so, the stem molds at each end need to be double the width of the other forms. Unfortunately I've used up all my MDF but fortunately, I located enough leftover 1/2-inch plywood from a previous project to glue and screw a second layer to both stem molds.

Then as with the other forms, I did some sanding and matching to the plan lines.
The next steps will be to clean up the porch work area and build the strongback to which the forms will be attached.